Last updated: 07 Nov 2024
Task Manager
In the Task Manager, all of your compliance to-dos come together. This section provides a centralized space for creating, assigning, scheduling, and managing tasks, bridging the gap between planning and executing your compliance plan.
If you are subscribed to the Actions module, you’ll find Task Manager under the Actions module, below the Actions Planner. Otherwise, it will appear as a standalone module below your Requirements module.
Here, you have a variety of views to help manage your compliance tasks: All Tasks, Calendar, Due Date, Status, Assignee, and Projects. You’ll also see the Action Area view if you have the Actions module.
To access the Task Manager, navigate to the left menu and click on Task Manager.
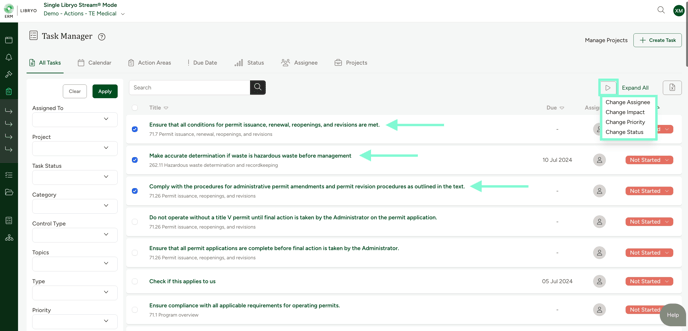
Task Manager - All Tasks
1. In the All Tasks view, you can see a list of All Tasks. This provides a single list of your tasks which can be ordered in various ways.

2. On the left, you can use filters to refine your Task search results, and next to this, you’ll find the Search function. Further, you can order the results differently by clicking on the down arrow next to Title, Due Date, Assignee, and Status.

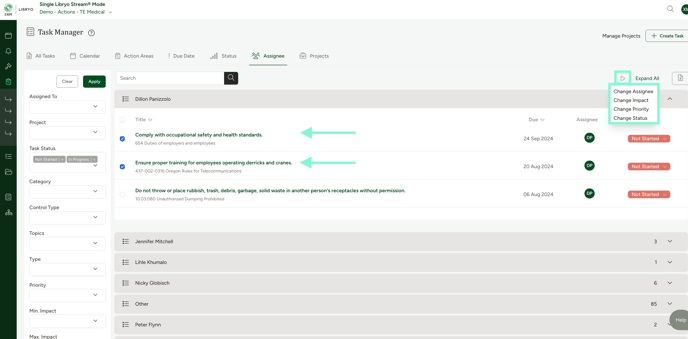
3. You can make bulk changes to the Assignee, Impact, Priority, or Status of Tasks by using the checkbox next to any Task to select it, and then by clicking on ![]() to choose the item you wish to change from the dropdown list.
to choose the item you wish to change from the dropdown list.

2. You can navigate to different dates by selecting the month and year from the dropdown menu on your left.

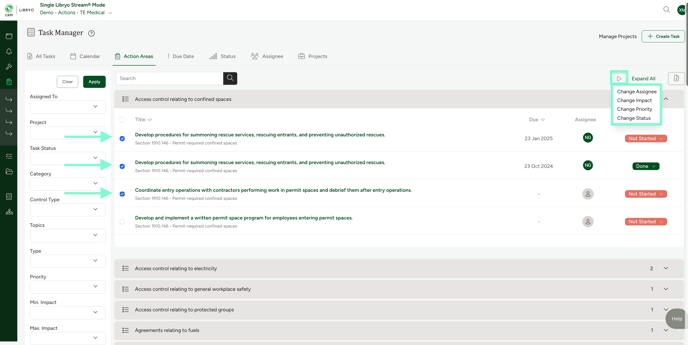
Task Manager - Action Areas
Note: The Action Areas view is only available to users subscribed to the Actions module.
1. In the Action Areas view, you can see all Tasks grouped by Action Area. These are categorized according to the areas outlined in the Actions Planner.

2. On the left, you can use filters to refine your Task search results, and next to them, you’ll find the Search function.

3. You can make bulk changes to the Assignee, Impact, Priority, or Status of Tasks by using the checkbox next to any Task to select it, and then by clicking on ![]() to choose the item you wish to change from the dropdown list.
to choose the item you wish to change from the dropdown list.
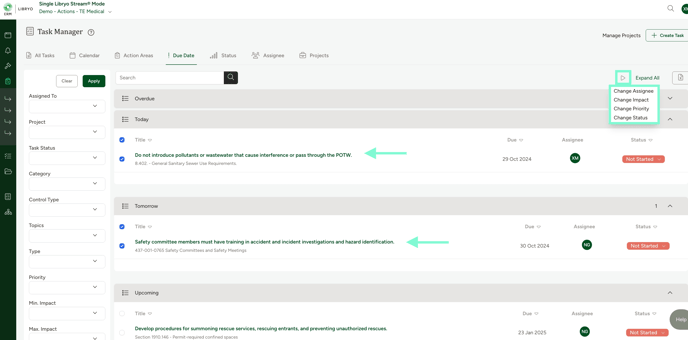
Task Manager - Due Date View
1. In the Due Date view, you can see a list of all Tasks grouped by Due Date. They are ordered and categorized by Overdue Tasks, Tasks due Today, Tomorrow, Upcoming Tasks, Future Tasks, and those with No Due Date.
2. On the left, you can use filters to refine your Task search results, and next to them, you’ll find the Search function.

3. You can make bulk changes to the Assignee, Impact, Priority, or Status of Tasks by using the checkbox next to any Task to select it, and then by clicking on ![]() to choose the item you wish to change from the dropdown list.
to choose the item you wish to change from the dropdown list.
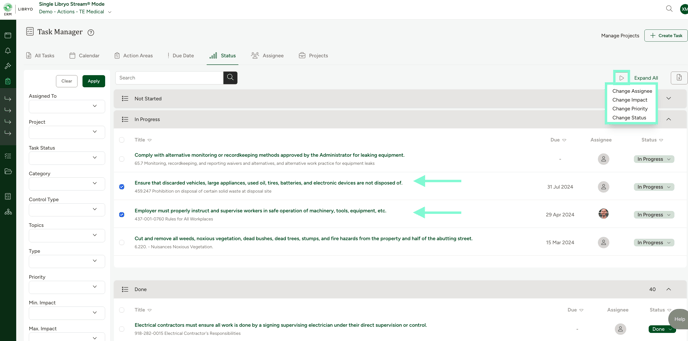
Task Manager - Status View
1. In the Status view, you can see a list of all Tasks grouped by Status. These are ordered and categorized by Not Started, In Progress, Done, and Paused.
2. On the left side, you can use the Search function located at the top, and use the filters to refine your results.

3. You can make bulk changes to the Assignee, Impact, Priority, or Status of Tasks by using the checkbox next to any Task to select it, and then by clicking on ![]() to choose the item you wish to change from the dropdown list.
to choose the item you wish to change from the dropdown list.
Task Manager - Assignee View
1. In the Assignee view, you can see a list of all Tasks grouped by Assignee. This enables you to see the Tasks assigned to each member of your team.
2. On the left side, you can use the Search function located at the top, and use the filters to refine your results.

3. You can make bulk changes to the Assignee, Impact, Priority, or Status of Tasks by using the checkbox next to any Task to select it, and then by clicking on ![]() to choose the item you wish to change from the dropdown list.
to choose the item you wish to change from the dropdown list.
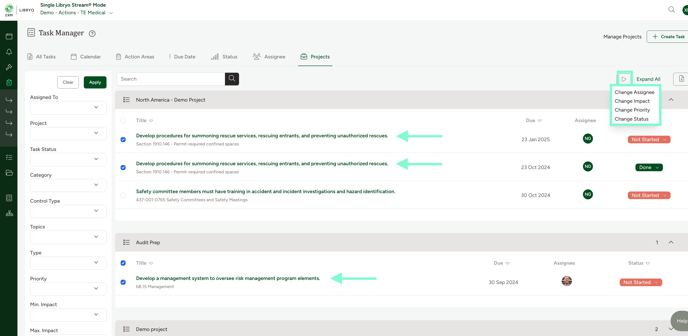
Task Manager - Projects View
1. In the Projects view, you can see all Tasks grouped by Project.

2. On the left side, you can use the Search function located at the top, and use the filters to refine your results.

3. You can make bulk changes to the Assignee, Impact, Priority, or Status of Tasks by using the checkbox next to any Task to select it, and then by clicking on ![]() to choose the item you wish to change from the dropdown list.
to choose the item you wish to change from the dropdown list.
Creating a new Task in Tasks Manager
1. To create a new Task, click on the button labelled Create Task, located at the top-right of the screen.

2. Choose a Title, select the level of Impact, set a Due Date, select the Priority level, and provide a Description for the Task. Then, click Save, or click Save & Edit if you want to make further edits.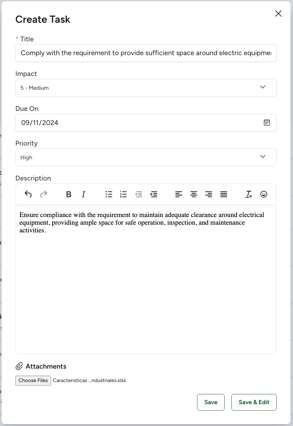
Editing a Task Tasks Manager
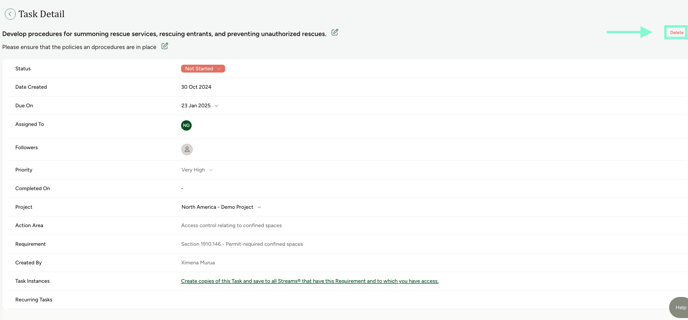
1. To edit an existing Task, click on the Task you want to make changes to and it will open for editing.

2. At the top of your screen, you can see the title of the Task. Click the symbol next to it to make edits. Additionally, you can also edit the Task’s description by clicking the edit symbol next to it.

3. Here, you can also manage the task details: modify the task’s Status, view the Date Created, update the date when the task is Due On, select an Assignee, add Followers, set a Priority, add the date the Task was Completed On, link it to a Project, review the Action Area and related Requirement, see who the task was Created By, copy the task to all sites with the related requirement in Task Instances, and set a recurrence frequency for Recurring Tasks.

Note: The related Action Area is only displayed to users subscribed to the Actions module when the task is created within the module.
4. Under Files, you can upload any related Files, such as proof of compliance, supporting evidence, or Files that will assist Assignees with the completion of the Task. Click on Upload Files and select the file that you want to link to the Task.

5. Under Activity, you can track all the User activities recorded against the Task since its creation, including changes in Status, Assignee, or the uploading of new Files.

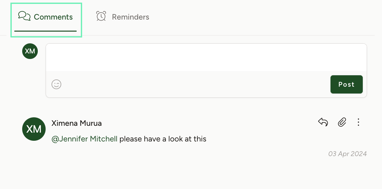
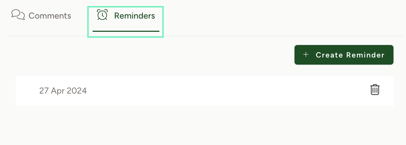
6. Under Comments, you can add Comments and communicate with your team about the Task by at-mentioning them (using the @ symbol and then selecting their name from the list of names that appears). The team members you @ in a Comment will receive an Alert in the platform and will also be notified by email.
Have any questions?
At ERM Libryo, we really want all our users to get the most from our platform. We hope that this article was useful. If you still have some questions, please email us.